Friday, October 5, 2007

More Autumn masking fun!

I love masking. There is so much you can do with it to create scenes. While cleaning out my stamp room yesterday I found this designer paper that I had bought eons ago and can't even remember where or when. It's hard to see in real life but the desinger paper is thin and you can see the fibers. It's also sort of shimery.


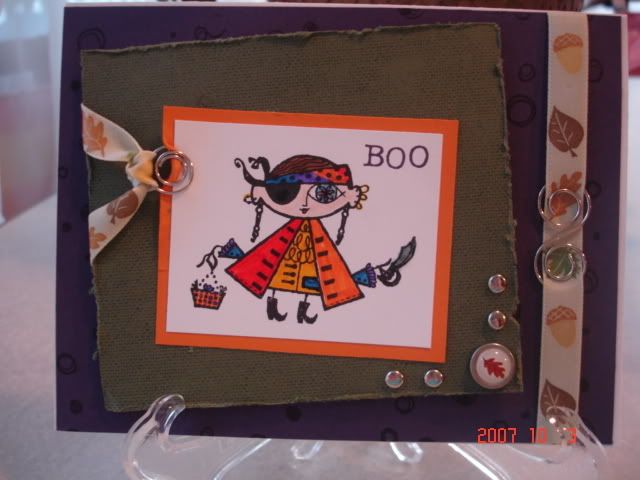
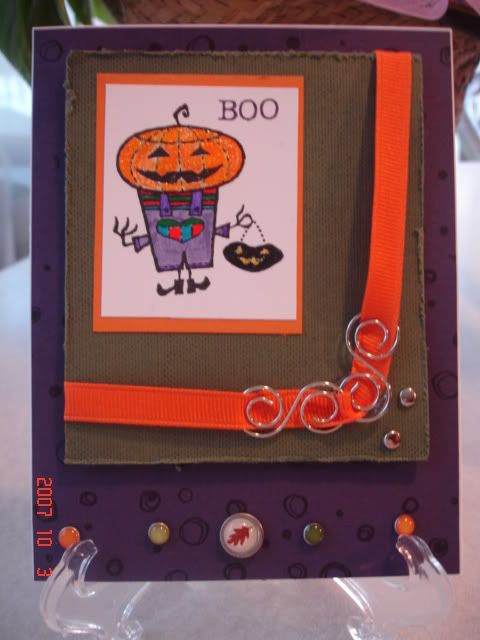
For this card I used Autumn Harvest and masked the pumpkin while putting leaves and gourds behind it. I colored in using markers and my white gel pen. There is stickles randomly on the items. The angled piece behind the main image is ticket punched with leaves stamped on the corners and colored in with my blender pen and the lids of the stamp pads. I used a corner decorative punch I got from Michaels and cut out the corner part. Both the background and the image white pieces are stamped with the background stamp Linen in Creamy caramel. IRL it turned out perfectly. This is one of those cards that I will not be able to let go of, especially since I only had one small piece of that designer paper.

Recipe:
Stamps: Linen background, Autumn Harvest
Cardstock: Chocolate chip, Whisper white, purely pomegranate, Blue Bayou, Random DP
Ink: Chocolate Chip, Pumpkin Pie, Creamy caramel, always artichoke, Cranberry Crisp
Accessories: brads, clip, ribbon, stickles
Technique: Masking

Thursday, October 4, 2007

My stamp area


All morning today I worked on re-arranging and organizing my stamp area.


Wednesday, October 3, 2007

New halloween stamps


I just got this stamp set today from The Angel Company. I LOVE this set!!! It's so adorable! I used Elegant eggplant with See You Around jumbo wheel. I then stamped Always artichoke with linen background. I roughed up the edges. I used Pumpkin Pie layer under the main image. The image is colored in with markers of all colors. The brads and ribbon are from Targets $1 spot. It's hard to see but the pirate has a glass eye.


I just got this stamp set today from The Angel Company. I LOVE this set!!! It's so adorable! I used Elegant eggplant with See You Around jumbo wheel. I then stamped Always artichoke with linen background. I roughed up the edges. I used Pumpkin Pie layer under the main image. The image is colored in with markers of all colors. The brads are from Targets $1 spot. It's hard to see but the pumpkin head has stickles on it.

Thursday, September 27, 2007

Fall sketch


I did the card sketch from yesterday on SCS. I REALLY like this sketch. There are tons of possibilities possible.


I used papertrey white as my card base and around the outside I stamped the leaves from autumn harvest in chocolate chip. I then colored in the leaves and used my white gel pen to accent. for the large back layer I used chocolate chip cardstock and stamped the acorns in chocolate chip. I used Marigold morning cardstock for the strip and stamped the leaves again using creamy caramel. The pumpkin pie is directly behind the image with square brads on each side. The image is on whisper white framed by chocolate chip. I used both the large and small pumpkin as well as the leaves using the masking technique. The pumpkins are stamped using pumpkin pie, then colored in with water colored pencils and my white gel pen for detail. The leaves are chocolate chip and purely pomegranate. Hemp twine and a silver clip on the corner finish it off. I LOVE this stamp set!

Recipe:

Cardstock: Papertrey white, whisper white, chocolate chip, marigold morning, pumpkin pie

ink: chocolate chip, pumpkin pie, purely pomegranate, creamy caramel

stamps: Autumn Harvest

accessories: brads, hemp twine, sliver clip

techniques: masking, watercolor

Tuesday, September 25, 2007

Snow Burst Flurries

This card is a tad out of my element but I enjoyed making it!
For the main cardbase I used Blue Bayou. I cut a piece of sage shadow about 1/8" smaller on each side and stamped random snowflake stamps from Snow Burst with white craft (pigmant) ink. I took a piece of gray cardstock cut in a triangle and then chopped the two corners off leaving the top peak. I cut a piece of vellum 2 1/2 by 3 1/2. I ran both of those (the gray and vellum) through my snowflake cuttlebug folder and ran a brayer over both with white craft ink and heat embossed using clear embossing powder. I layered it as you see, wrapped SU white organdy ribbon around both the gray and vellum. The 'Merry Christmas' is from the stamp set All-year Cheer III and it is stamped in Blue Bayou ink. I roughed the edges of the sage shadow and sponged blue bayou ink around it.
Recipe:
Cardstock: Blue Bayou, Sage Shadow, Gray, Vellum
Ink: Blue Bayou, White craft
accessories: ribbon
techniques: Dry emboss, heat emboss

Monday, September 24, 2007

Woodcut Holly treat boxes


These little triangular boxes are super simple to make.
To make the box.
1. Cut cardstock 3"x6" Decorate as desired, wait to put dimensional decorations until put together.

2. with the 6" length at the base of your paper scorer, Score at 3"

3. Mark on the 3" length at 1 1/2 (half way), on both sides. Score diagonally from the 1/2 way point of the 3" length to the score line made at 3".

3. punch holes on each corner, I used the 1/8th" hole punch on my cropadile.
4. Fold the corners in to give a crease
5. As shown, pull ribbon through from the outside in hole 1, then from the outside of hole 2. Now is the best time to pop that treat in the box, then bring the ribbon through from the inside of hole 3 and from the inside of hole 4. Pull tight and tie.
6. Add any dimensional additions wanted.
On my example. I used wild wasabi cardstock and rolled Woodcut Holly Jumbo wheel in wild wasabi. Using household bleach and a small paintbrush I then outlined a few of the holly leaves to give it dimension. I used a blender pen and the lid of my purely pomegranate ink pad to color in the berries, they showed up nicely! I then added a tad of stickles to each berry.
For the ribbon. I used THIS method for dying my ribbon Purely Pomegranate.
Recipe:
Cardstock: Wild Wasabi
Ink: Wild Wasabi, Purely Pomegranate
Accessories: White SU grossgrain ribbon, bleach

Friday, September 21, 2007

Limited Layers Challenge


Todays challenge over at SCS was to limit your layers to 4-5. I didn't really have a problem with it since I tend to use very few layers as it is.


I started off with my papertrey white cardstock as the card base. I used Purely Pomegranate and the wheel See You Around to make the background. I cut a piece of purely pomegranate cardstock and folded it on the top. I scalloped both the top and the bottom. I then layered behind it with So Saffron also scalloping the end to keep that 'round' look. I used my new hostess set 'In The Spotlight' and stamped the flowers with Purely Pomegranate and the stems and leaves in Wild Wasabi. I then stamped the center of the flowers in wild wasabi and cut them out. I used my white gel pen to add a little accent around the purely pomegranate cardstock and flowers. I tiny bit of stickles on the leaves and white ribbon accent. I hope you enjoyed!
Recipe:
Cardstock: Papertrey White, Purely Pomegranate, So Saffron
Stamps: In The Spotlight, See You Around
Ink: Purely Pomegranate, Wild Wasabi
Accessories: Stickles, Ribbon, White gel Pen