Thursday, September 27, 2007

Fall sketch


I did the card sketch from yesterday on SCS. I REALLY like this sketch. There are tons of possibilities possible.


I used papertrey white as my card base and around the outside I stamped the leaves from autumn harvest in chocolate chip. I then colored in the leaves and used my white gel pen to accent. for the large back layer I used chocolate chip cardstock and stamped the acorns in chocolate chip. I used Marigold morning cardstock for the strip and stamped the leaves again using creamy caramel. The pumpkin pie is directly behind the image with square brads on each side. The image is on whisper white framed by chocolate chip. I used both the large and small pumpkin as well as the leaves using the masking technique. The pumpkins are stamped using pumpkin pie, then colored in with water colored pencils and my white gel pen for detail. The leaves are chocolate chip and purely pomegranate. Hemp twine and a silver clip on the corner finish it off. I LOVE this stamp set!

Recipe:

Cardstock: Papertrey white, whisper white, chocolate chip, marigold morning, pumpkin pie

ink: chocolate chip, pumpkin pie, purely pomegranate, creamy caramel

stamps: Autumn Harvest

accessories: brads, hemp twine, sliver clip

techniques: masking, watercolor

Tuesday, September 25, 2007

Snow Burst Flurries

This card is a tad out of my element but I enjoyed making it!
For the main cardbase I used Blue Bayou. I cut a piece of sage shadow about 1/8" smaller on each side and stamped random snowflake stamps from Snow Burst with white craft (pigmant) ink. I took a piece of gray cardstock cut in a triangle and then chopped the two corners off leaving the top peak. I cut a piece of vellum 2 1/2 by 3 1/2. I ran both of those (the gray and vellum) through my snowflake cuttlebug folder and ran a brayer over both with white craft ink and heat embossed using clear embossing powder. I layered it as you see, wrapped SU white organdy ribbon around both the gray and vellum. The 'Merry Christmas' is from the stamp set All-year Cheer III and it is stamped in Blue Bayou ink. I roughed the edges of the sage shadow and sponged blue bayou ink around it.
Recipe:
Cardstock: Blue Bayou, Sage Shadow, Gray, Vellum
Ink: Blue Bayou, White craft
accessories: ribbon
techniques: Dry emboss, heat emboss

Monday, September 24, 2007

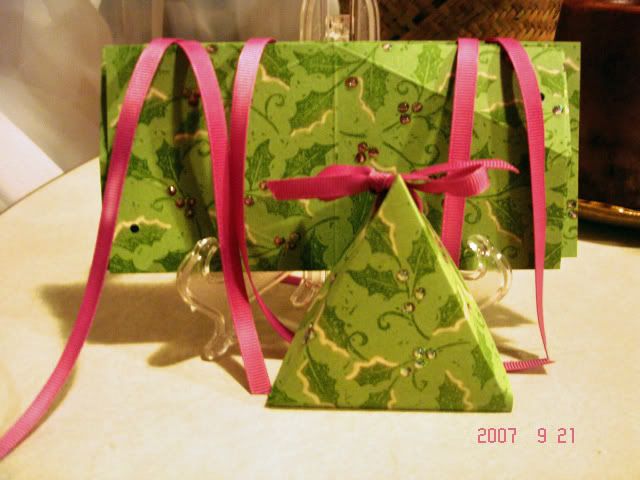
Woodcut Holly treat boxes


These little triangular boxes are super simple to make.
To make the box.
1. Cut cardstock 3"x6" Decorate as desired, wait to put dimensional decorations until put together.

2. with the 6" length at the base of your paper scorer, Score at 3"

3. Mark on the 3" length at 1 1/2 (half way), on both sides. Score diagonally from the 1/2 way point of the 3" length to the score line made at 3".

3. punch holes on each corner, I used the 1/8th" hole punch on my cropadile.
4. Fold the corners in to give a crease
5. As shown, pull ribbon through from the outside in hole 1, then from the outside of hole 2. Now is the best time to pop that treat in the box, then bring the ribbon through from the inside of hole 3 and from the inside of hole 4. Pull tight and tie.
6. Add any dimensional additions wanted.
On my example. I used wild wasabi cardstock and rolled Woodcut Holly Jumbo wheel in wild wasabi. Using household bleach and a small paintbrush I then outlined a few of the holly leaves to give it dimension. I used a blender pen and the lid of my purely pomegranate ink pad to color in the berries, they showed up nicely! I then added a tad of stickles to each berry.
For the ribbon. I used THIS method for dying my ribbon Purely Pomegranate.
Recipe:
Cardstock: Wild Wasabi
Ink: Wild Wasabi, Purely Pomegranate
Accessories: White SU grossgrain ribbon, bleach

Friday, September 21, 2007

Limited Layers Challenge


Todays challenge over at SCS was to limit your layers to 4-5. I didn't really have a problem with it since I tend to use very few layers as it is.


I started off with my papertrey white cardstock as the card base. I used Purely Pomegranate and the wheel See You Around to make the background. I cut a piece of purely pomegranate cardstock and folded it on the top. I scalloped both the top and the bottom. I then layered behind it with So Saffron also scalloping the end to keep that 'round' look. I used my new hostess set 'In The Spotlight' and stamped the flowers with Purely Pomegranate and the stems and leaves in Wild Wasabi. I then stamped the center of the flowers in wild wasabi and cut them out. I used my white gel pen to add a little accent around the purely pomegranate cardstock and flowers. I tiny bit of stickles on the leaves and white ribbon accent. I hope you enjoyed!
Recipe:
Cardstock: Papertrey White, Purely Pomegranate, So Saffron
Stamps: In The Spotlight, See You Around
Ink: Purely Pomegranate, Wild Wasabi
Accessories: Stickles, Ribbon, White gel Pen

Thursday, September 20, 2007

Criss-Cross cards

I bought the snowflake cuttle bug embossing folder today. I LOVE it!!! I also just recently bought a beautiful snowflake stamp set that I'd been dying to use and I think I found a great way!

Because of a challenge on Splitcoast, I wanted to try the criss-cross card. I embossed on a gray cardstock that I bought at the LSS. I then brayered white craft ink on the raised side and heat embossed with a Kaleidoscope embossing powder.


For the outside around the band, I put two layers of white Stampin Up grossgrain ribbon. I punched out a circle and stamped one of the snowflakes on it in wild wasabi then using the smaller snowflakes I stamped around the edges using wild wasabi, purely pomegranate and blue bayou, then used a scallop and punched out a larger circle for a layer in wild wasabi. It's hard to see in the picture but a little clear stickles accenting the snowflakes finishes the outside.


For the insert. I used Purely Pomegranate as the main piece then on the neutral piece I stamped the two same snowflakes in the right corners in purely pomegranate. I stamped 'Merry Christmas' from the set All-Year Cheer III in purely pomegranate. I used the same technique as the outside with the smaller circle and the scalloped circle but on a smaller scale. I stamped the snowflake in wild wasabi and edged the circle with wild wasabi.


Thanks for looking!!!


Sunday, September 16, 2007

Not much of a creating day..

BUT I have spent most of the day fulfilling some image wishes over at SCS. It's a fun feeling of fulfillment when you can take 10 envies to the post office that you know are going to put a smile on someones face. I also finished 2 swaps and got them ready to mail out tomorrow as well. Kinda stinks that the only time I'll have to mail those off will be during lunch. Talk about long lines!!

I'll admit... I did create one card but it ended up being one of the ugliest cards I've ever made so I am not going to post it here. *LOL*

Hope everyone has had a very peaceful Sunday!

Saturday, September 15, 2007

Halloween is drawing near

I have a couple of halloween cards I'd like to share today. These are for some swaps over on SCS.

Sweeter Treaters

I cuttlebugged elegant eggplant for the bacground, punched out a 2" circle in pumpkin pie using a marvy punch and used a corner rounder on garden green to layer under my sweeter treater. You can't see it in the picture but there is glitter on the pumpkin smile and the caramel apple is heat embossed using a cranberry color on the apple and clear on the caramel after coloring it with a light brown. The kid is watercolored with watercolor pencils. I used brads and orange ribbon to add some accessories.

Recipe:
Cardstock: elegant eggplant, pumpkin pie, garden green
Ink: Black, versermark
stamps: sweeter treaters, all year cheer III
accessories: brads, ribbon, glitter, embossing powder
techniques: heat embossing

Halloween ATC
This is an artist trading card. Which is a 2.5" x 3.5" card the size of a baseball card. This particular card is a tri-fold artist trading card. The overall size is still 2.5x3.5 but it opens up.


FRONT: I used the SU designer paper Creepy Crawly for the background on both panels. I used a 2" marvy punch and punched out my booglie eye on very vanilla and colored him in. I traced an outline from a top on a can on the pumpkin pie to make it larger than my booglie eyes. It's probably ~3" diameter. I then punched out a smaller circle in the center of that. I took my slit punch and went around the circle making a scalloped circle that would fit on the card. That was my first time doing that and it turned out nicely and such an easy way to get a scalloped circle! I used my scissors to roughen up the edges of my booglie eyes and sponged pumpkin pie ink around the edges. You can't see it in the picture but there is a bit of glitter glue on my mummy to give a bit of sparkle. I put brads on each corner. I used pop up dimensionals on the right side under the image and used round velcro to hold it down.


INSIDE: You can see there on the right under the orange scalloped circle where the velcro is. I also covered up the cut out part with more of the creepy crawly DP. Also using the same DP paper I covered the outside panels and the center. I then layered very vanilla on the DP and stamped "Happy Halloween" in pumpkin pie using All year cheer III.
Overall I ended up using 3 different patterns from the creepy crawly designer paper. I REALLY enjoyed making ATC's!
Recipe:
Cardstock: pumpkin pie, very vanilla, creepy crawly DP
Ink: Black, pumpkin pie
stamps: booglie eyes, all year cheer III
accessories: brads, glitter
techniques:

Thursday, September 13, 2007

Happy Fall

I have several cards to download today!

SCS card sketch 9-12-07
The first one is for the SCS card sketch challenge from 9-12-07.


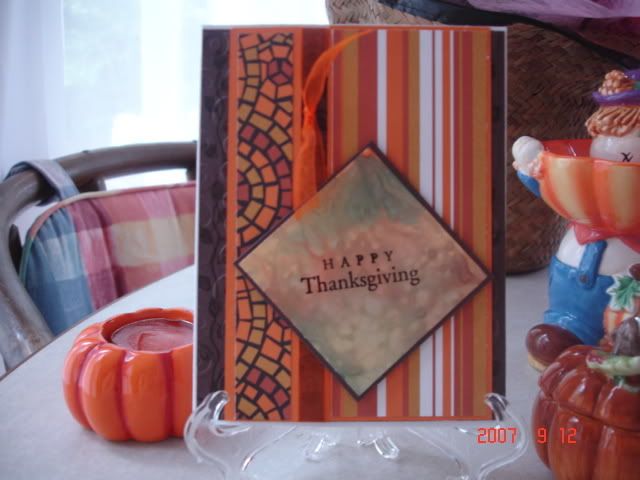
This is made with the Stampin' Up designer paper 'Creepy Crawly' and a leftover piece of 'smashed' paper in another challenge. I took Chocolate chip paper, used the leaves in Watercolor Garden and stamped a background using chocolate chip ink. I then put it through my cuddlebug to give it dimension. I layered the Creepy Crawly DP on pumpkin pie cardstock and put an orange organdy ribbon between the two panels that I bought from Ribbons and Bows, Oh My online. The main image is layered on chocolate chip card stock and the 'Happy Thanksgiving' from the set All-Year Cheer III is stamped on with chocolate chip ink. I hope you enjoyed!

Recipe:
CS: Chocolate Chip, Pumpkin Pie, Glossy white, Creepy Crawly DP, papertrey white for cardbase.
Ink: (Smashing: pumpkin pie, chocolate chip, summer sun, garden green), Chocolate chip
Stamps: All-year cheer, Watercolor Garden
Technique: Smashing, cuddlebug


Happy Grandparents Day!
This card I made for my grandmother for Grandparents day. She really liked it even though it was a pretty quick creation.


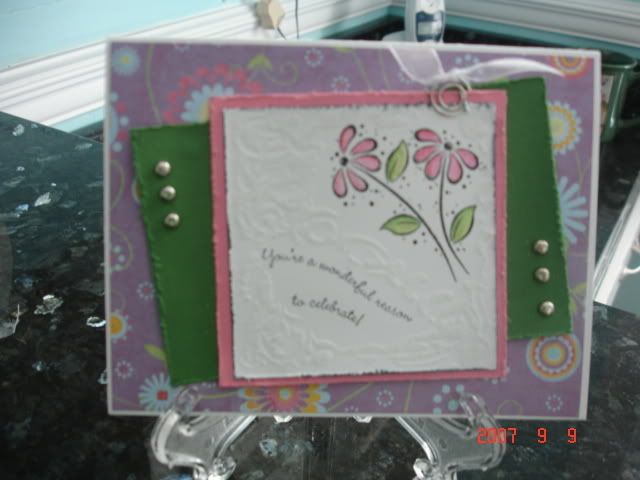
I used a designer paper that I bought from Michael's, Stampin' Ups Garden Green and Regal Rose, Papertrey white. The stamps are The Angel Company's Oopsie Daisy colored in with watercolor pencils and Stampin' Up Curvy Verses that says "You are a wonderful reason to celebrate!" I then scoured the edges of the green and white for a little texture added craft glue and glitter throughout the main image for a little pizazze. A few brads, silver clip and white Stampin Up organdy ribbon finish off this card. I hope you enjoyed!

Recipe:
CS: Garden Green, Regal Rose, Papertrey white, Michael's DP
Ink: Basic Black
Stamps: TAC Oopsie Daisy, SU Curvy Verses
Technique: watercolor pencils

Sunday, September 9, 2007

Money holder tutorial


This is super duper easy to make! My mom came to me and said do you think you can make a money holder? I said "SURE! I can figure it out" I looked online and tried to find one but didn't find one I liked really so I used what the banks give when giving back money as inspiration.
Take a sheet of double sided paper 7"x7 3/4"
On the 7 3/4" side, Score at 3" and 6" as shown.


Randomly cut out part of both sides


Using sticky tape, tape along the back


Fold down the long 3" side


Put sticky red tape on the bottom of the short flap


Fold over to make your money holder


Decorate to your desire!


Wednesday, September 5, 2007

Surgery recovery

I had my gallbladder removed Thursday. I have heard so many people say 'oh recovery from that is no big deal' 'you should be back to work by Tuesday'. Uhmm....... NO! I'm still sick and hurt and miserable! :( Just thought I'd throw that out there.

Problem card


What to do what to do. Today I'm going to play with this card and either fix it or start over. Here is the original:


There have been many suggestions from adding ribbon to changing the sentiment background to changing the card background to leaving it alone. I've got a few ideas in my head that I'm going to play with.
The blue icing is important but I really needed cool caribbean for the layered piece and didn't have anymore. Maybe I can find a scrap or two! :) Stay tuned for updated pictures.
recipe: Stamps: Housemouse, The Angel Company Whimsical words. Paper: close to cocoa, night of navy, whisper white. Ink: black, close to cocoa. Accessories: Brads.